Hair for Games
Greg Mourino shared his experience of taking CGMA’s course Hair Creation for Games led by Johan Lithvall and talked about the difference between the game and cinematic hair, its optimization, working with individual hair pieces and more.


Introduction
Hello! I’m Greg Mourino, a senior technical artist at Blue Sky Studios. I’m originally from New York and was briefly a math teacher in NYC before I decided to make the jump into digital artistry. I started in the industry by focusing on simulated clothing. For a few years, I worked as someone who would give life to clothing, capes, armor, fur, etc. – anything to help underscore some really nifty character animations! These days I focus mostly on the crowd simulation work: populating cities, markets, stadiums, and villages with all sorts of people and animals. I’ve worked on Ice Age 4+5, Epic, Rio 2, Peanuts, Ferdinand, and some unannounced upcoming projects. I’m also a game dev hobbyist who loves to tinker with indie projects in my spare time.
Goals
I found Hair Creation for Games course through the CG Society’s email list. There was an announcement for the Hair For Games class, and I knew I had to get on board. A big challenge we’ve been facing lately is finding the balance in the render performance of crowd characters with their final appearance. So far, we haven’t really hit on a solution that I’m satisfied with, so I’m constantly on the hunt for more ideas for things we can try. I was really impressed with Johan Lithvall’s work in his previous projects, so I knew I’d learn a ton by checking out his course. My goal was to learn what I could and figure out what we could apply to our pipeline and make it more efficient with our current workflow. After all, there’s a surprising amount of crossovers between games and film when it comes to crowd work!

Game Hair vs. Cinematic Hair
Hair in games and film sometimes end up with similar looks, but they diverge when it comes to acting requirements and render cost. In a film, the behavior callouts for a hair groom can vary widely, and self-collision is an issue that we will spend a tremendous amount of simulation time to avoid. Also, there’s nearly no limit to how many curves we’ll throw at a renderer to display a really nice-looking hairstyle. It’s costly, but these characters end up on very large physical media with very close cameras, and a high level of detail is necessary.
In games, the affordability of a final groom’s render is measured in milliseconds, not hours or days on a render farm. The team sizes for games are also generally smaller which makes it harder to devote a lot of RnD time to find a clever solution to something that probably won’t have a direct impact on gameplay. As a result, hair in games usually leans towards a combination of polygon cards and shader tricks in order to make sure a character’s hairstyle doesn’t drop the game below 60 fps. I sympathize a lot with those constraints because animated crowds need to be optimized like game assets if we’re going to get the job done in time.
Optimization for Real-Time Environments
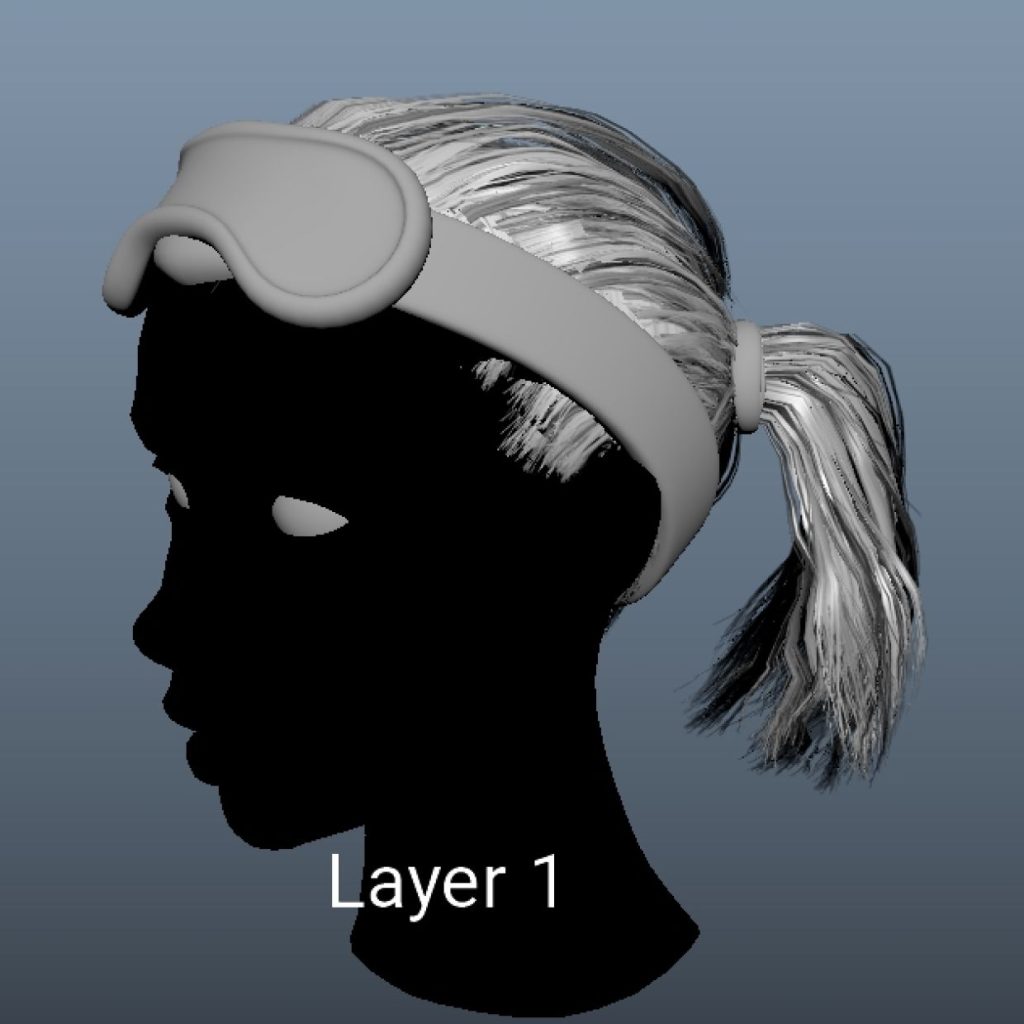
The best way to get that kind of heavy content into a real-time environment is to cheat like a bandit! Replace those curves with polygon approximations, use shader tricks, textures, and even lighting to approximate the heavy version of the asset. Plan for the final look/behavior, and reduce, reduce, reduce.

Some of the fancier hair in AAA games is augmented by (or completely handled by) custom plugins. NVIDIA’s HairWorks is a good example here. But even without access to a powerful solution like that, an artist on a small team can do amazing things with nothing more than some scripting and patience. You can create a few depth/color/spec/alpha textures from a DCC like Maya or Blender, and use some simple shader code to apply those to some polygon cards that have been carefully placed where the hair groom is. This lets you bring a lot of apparent detail into your game engine without paying the gold price for it.
One of the things I really liked about Johan’s approach in this class is that it is a solid technique that would be very hard to break, even with changing plugins and software dependencies. It’s more of a model-building philosophy than a bunch of interwoven technical tricks, and it’s likely to work with nearly any toolset. As someone who supports a complex pipeline, I really appreciate that!
Cost of Hair
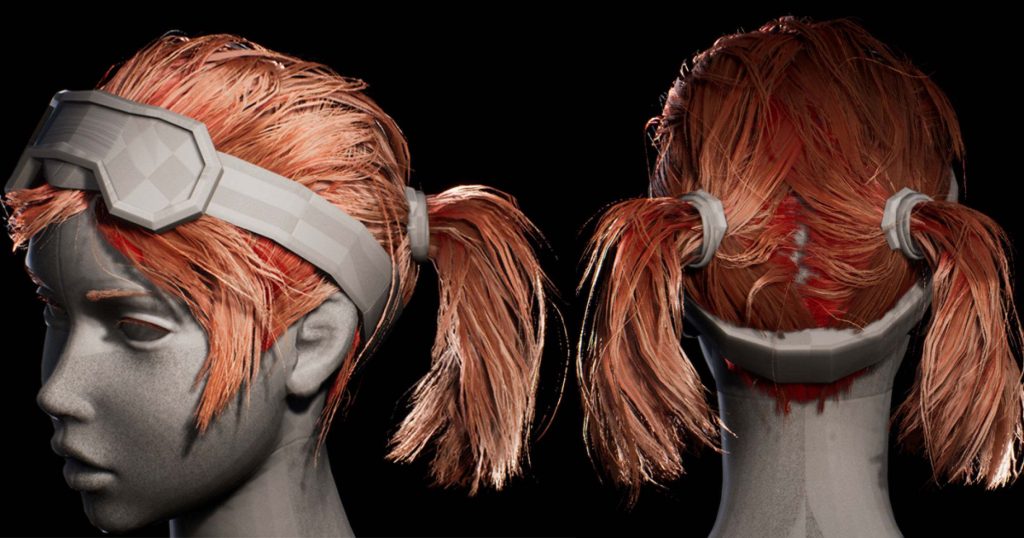
The cost of hair is something that’s pretty specific for your current project and your target hardware. As a general rule, I’d recommend trying to batch your materials as much as possible and re-use the same material with a color or texture variation whenever possible. In my example, the entire hair groom is a single material from a custom shader with a handful of textures. Other characters have different hairstyles but still, use the same shader/textures with a color variation. I let the silhouette changes and mesh vertex colors do the work for me.


Hairstyle
The pigtails were a fun exercise. That character is for a game where arcs are a recurring theme, and I wanted that to appear everywhere in her design. Even in her hairstyle choice! The biggest challenge with this style was how tight it was. With a method like this, there is some trickery with the polygon hair cards and I did not give myself enough space to hide undesirable parts of her hair clumps. The next time I do a character with a pulled-tight style like this, I’m going to probably start by doubling the hair volume for that reason.
The payoff for this kind of hairstyle is that I can ignore motion on most of her scalp since it’s so restricted. For the pigtails and the bangs, I use a simple joint chain to add secondary motion, and there’s plenty of space so that I don’t have to worry about the collision with things like the character’s garments or shoulders.
She’s also wearing goggles which required a lot of noodling to get enough hair in place without making the goggles look like they were floating in space. Since she’ll be taking off her goggles, I planned the placement of these hair clubs so that I could minimize how much reworking of the groom I’d need to do when I make her bareheaded variation.

Working with Individual Hair Pieces
Hairstyles that involve individual hair pieces going into different directions are several layers deep. They’re built up over several passes and draped differently depending on where they live and how they would fall in a real-world scenario. The placement of the messier clumps was also heavily inspired by the reference I had gathered. It helps a lot to keep checking that as I’m making important style decisions.

To help the individual hairs integrate, there are special parts of the texture dedicated to those flyaways and smaller clumps. The flyaways add a huge amount of liveliness to the style, especially since this character has reddish hair, which is generally coarser and a little more stubborn to handle. To make life even more interesting, this asset was meant to be seen at a distance, and many of those flyaways would be culled. To keep some of that tousle readable at a distance, I tried to keep her outermost layers (that were not flyaways) a little messy.


Rendering
The engine is basically your weapon of choice. For the class we used Unreal, but I later replicated the shader in Unity and it would be pretty easy to do with any other game engine.

If you’re just doing a standalone groom as we did in the class, a classic studio lighting setup with a fill, rim, key, and bounce light is all you need. Portrait photographers have a lot of standard approaches to single-subject lighting and there’s a huge plethora of information available on that online.

Equally valuable for final renders are mockup tests. Does the character look good in the environment that it’s meant to be seen within? If not, you may want to tweak the shader to suit that style. I don’t mind unrealistic lighting or faked techniques if it makes the character read easier and integrate better within its environment.

Utilizing Your Assets
I re-use as much as I can for as long as I can! I’ve only created textures for two types of hair so far, so I’m definitely going to be making more. These textures wouldn’t be helpful with straight or kinky hair, but the same method for creating new textures will work for those cases, as well.
Time
The hair takes me far too long. I do mostly non-hair things for my characters, so I’m not nearly as fast as a specialist. I’d probably give myself a week to make a new groom: one day for the texture and clump generation, two for placing and styling the hair, one for rigging and addressing notes, and one for testing the groom in various lighting setup and shader tweaks.
Feedback
The core content of the class is delivered via video lecture and Johan would answer any questions we had during the course of the week in our class forum. But the live chat Q&A sessions we had each week was the most interesting part, by far. He was very helpful, and we got to dig into some interesting examples during those!
I think both experienced artists and those like myself who are outside of the games industry would get some good information from this course. For beginners wanting to get into the character creation, there’s a lot of content that would be beneficial, but note that it requires a base knowledge of core CG principles. Before signing up, I’d encourage newer students to make sure they have a solid understanding of polygon modeling, UVs, texture baking, dynamics, and game engine requirements.


