How to Create Game Character Hair: Medieval Braid
My name is Calvin Verhoolen. I am a Senior Character Artist working in Berlin/Germany.
I started 3D in the year 2000, working at Eurocom Development Ltd. UK on titles like James Bond – TWINE, Nightfire and Pirates of the Caribbean. After working for Climax Ltd. on Silent Hill Origins, I moved back to Germany to join Yager Development for cool projects like Spec Ops – The Line and Dead Island 2. I also worked on some interesting mobile games at Wooga.
I am self-taught and enjoy learning something new in anything I do. The fastest way to learn, of course, is by having a good mentor. This led me to CGMA, who has a great selection of courses and mentors to choose from. When I saw that Johan Lithvall was presenting his course Hair Creation for Games, I did not hesitate to enroll.

Reference is key
Hair in games is both interesting and challenging, since there is a lot to consider and execute correctly.
It is an enormous time commitment, and I have yet to see someone create hair fast. As with everything in art: Reference is key!
Hair is one of the best tools to create personality in a character, since it shows a lot of attitude.

Which hair style do I want? Is the character well-kempt or does he/she/it not bother with hair?
How does it frame the face? Does it hide the face? What colour does it have?
All those decisions will shape the way people will perceive the character's personality and goals.
Once your reference is collected and represents what you want to express, you need to understand the hair you want to achieve in its physicality. Where are the roots? What is the growth direction and how does the hairline separate hair from skin? How is it structured and what are the details?
Workflow
Planning:
Armed with all this information about the hair to be created, you hit the technical limitations of the real-time world, forcing you to plan out your hair to be efficient in polycount as much as texture and space.
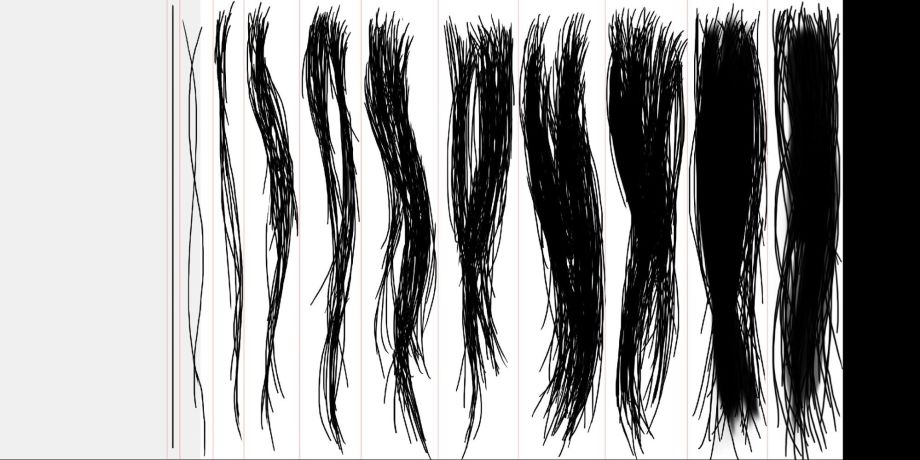
Start planning out your texture with painting a quick map of it in Photoshop. This is a good chance to study the reference more in-depth. For long hair, it is best to lay out the texture in a 2:1 aspect ratio, keeping in mind to leave some space for any additional hair you want to create later when needed. The hair becomes less dense from right to left.

Texture:
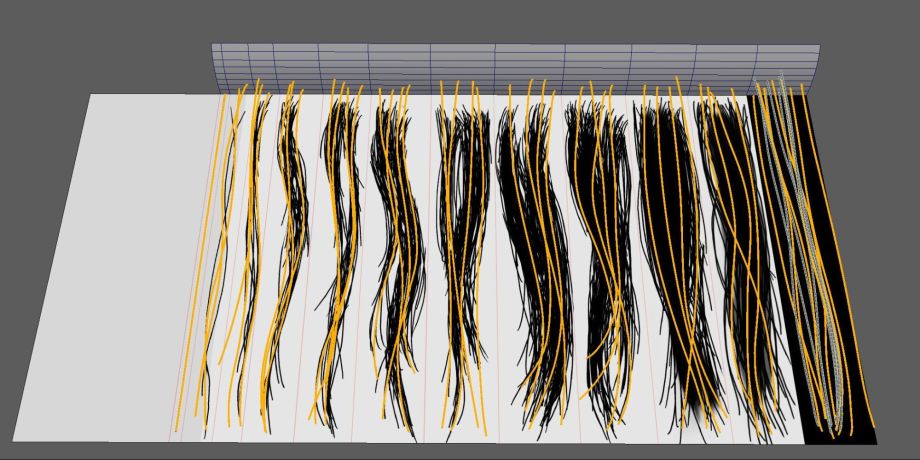
XGen will be your next stop to create the texture you need for the final asset. Map the planning texture onto a ground plane that has the same aspect ratio as the texture.
Then extrude the top edge upwards to create planes to spawn your hair from. After this base setup is done, you can spawn some spline curves by painting them into the ground plane in top view, while using the planning texture for reference. Those splines will then be converted to XGen guides. XGen can be used to define the amount of hair per card, clumping, noise and other attributes of hair.

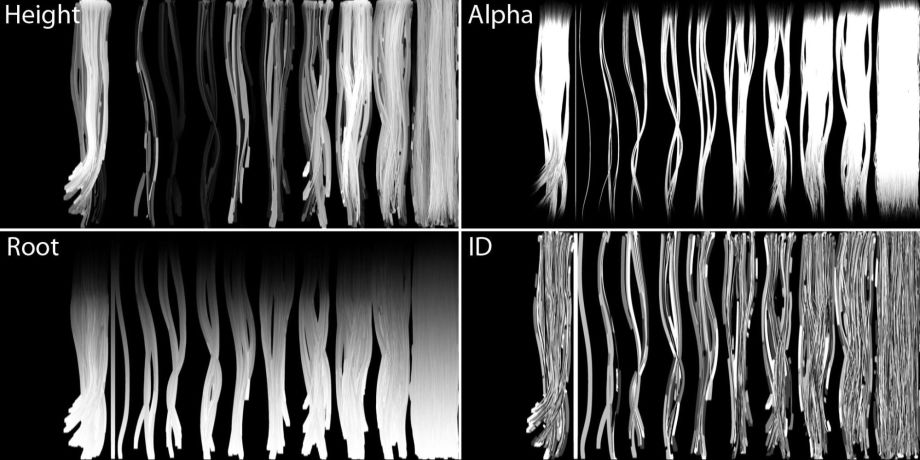
Once this is done, the hair is converted into geometry and baked down to the ground plane. This way you can create all texture maps used by the shader in Unreal. There will be a height map, alpha, some gradients and an ID map. You can cut the plane into your final hair cards afterwards.

Mesh:
With the hair cards and textures created, the actual process of creating the hair mesh can start.
The most dense cards are used to create the block-out hair, which will define the main look. It is important at this stage to make sure you cannot see through the hair onto the skull or through to the other side. Once this is blocked out, the second and third layer of hair will be created on top, leaving some negative spaces to give the hair depth. As with most assets in art, we go from large to small detail. The later is created at the end and the most fun bit since it will give the assets its final volume, flow and shape. Finishing with flyaway hair will tie up the silhouette and finalize the mesh.

Engine:
With the mesh done, it is almost ready to be exported into the engine. To enhance the depth and control it in the shader, ambient occlusion is going to be baked down into the vertices, and then the asset can be exported. The engine stage has finally been reached and the mesh and textures can be imported. The shader used in this asset is the hair shader Epic provides in their character benchmark scene. Once this is set up, it is all about careful tweaking of the attributes in the shader.
This hair asset has about 40K polygons, which is quite heavy for hair. There is still a lot that can be cut down, especially on the Base Layer of hair, since it is the most covered layer. Apart from that, the top layer with flyaway-hair can be switched off in the first LOD pretty quickly and Simplygon can be used for the rest of the hair afterwards.
Final words
Hair in real-time is still a very complicated matter. The creation of hair simply takes time, even on an expert level. It cannot be scanned or automatically built at this stage. Research, planning, baking, texturing and mesh creation, as well as integration into the engine and also animation preparation make it a costly matter for every production.
Animating a hair asset shows its own challenges, since using physics on these hair cards can lead to intersections which will break the illusion instantly.
But if this is done right, it pays off well by making your characters stand out, giving them and your project a lot more depth.
One strategy I keep being reminded of in my career, and also here by Johan, is that it is important to be able to kill your darlings early, or trim the unnecessary. So keep iterating every step of the way, but do it quickly to stay on schedule. Block-out your work to answer the most important questions of your task first, but also plan carefully to stay within budget/time.
I hope this general overview of the workflow was helpful to you as a reader. I can only recommend taking the course for more detail. I feel really lucky to have had the chance to be part of the CGMA Hair Creation for Games course by Johan Lithvall.
Interview conducted by Kirill Tokarev.
Learn more about the "Hair Creation for Games" CGMA class here.


