Animal Anatomy Production Guide
Phu Nguyen talked about his recent work made at CGMA and shared the process of creating a leopard.

Introduction
Hi, My name is Phu Nguyen, and I’m a Lookdev Artist working for Vinata Animation Studio in Saigon. I was interested in Painting and Drawing when I was a kid. Later, I went on self-taught on those things and slowly made a transition into 3D.
I started as a 3D Model and Texture Artist at outsourcing studios for the gaming industry, then I move to BlueR studio working on Film and TVC. Working on that team helped me improve so much and I can have an overall look about how each department (concept, model, animation, lookdev, comp, etc.) can connect/work together to fully create a product from start to end.
Now, besides working for my current studio, I also do some personal project at free time. Learning and experiencing new things, new knowledge and improving my self as an artist, and those are something I always looking for. So that’s why I decided to take the CGMA course “Sculpting Anatomy: From Animal to Creature”.
Gathering the Reference and Inspiration
For the first half of the course, our goal is to study a random animal and create a sculpture of him/her from the inside out (bone, muscle system, skin). So I started gathering reference images about Panthera, not any pacific type, just a bunch of images of tiger, leopard, jaguar, lion… as well as the skeleton, and anatomy references from the book. Two main books I like the most is:
- Animal Anatomy for Artists, The Elements of Form by Eliot Goldfinger
- An Atlas Of Animal Anatomy For Artists by W. Ellenberger, H. Baum, and H. Dittrich
I also take a look at some artwork from other artists, especially my lecturer, Gael Kerchenbaum, and Jun Huang from Jun Anatomy.
After that, I begin to analyze that information, compare proportions, shapes between each type, and try to imagine how the study could turn out. Finally, I decide to pick the Leopard (Panthera Pardus) because of how elegant the shape and the movement of that creature are! Then after that, the reference board was born!

Hand drawing anatomy references on the board are from the Lion, it’s a little bit hard to find the Leopard’s one, but It’s fine. Basically, Leopard and Lion are the same, they’re just different on the proportion, I can adjust it while sculpting.
Studying References and Creating the Skeleton Structure
The first thing I was going to do is to study and understand the references. The ASM for me was to draw a bone structure and muscle system on top of the photo of my creature. It seemed easy on the surface but kinda tricky because that was my first time to dig in, and studied every part of that creature. Besides that, I had to compare the leopard anatomy with human and other creature’s anatomy. And this helped me a lot in overlooking the whole project.


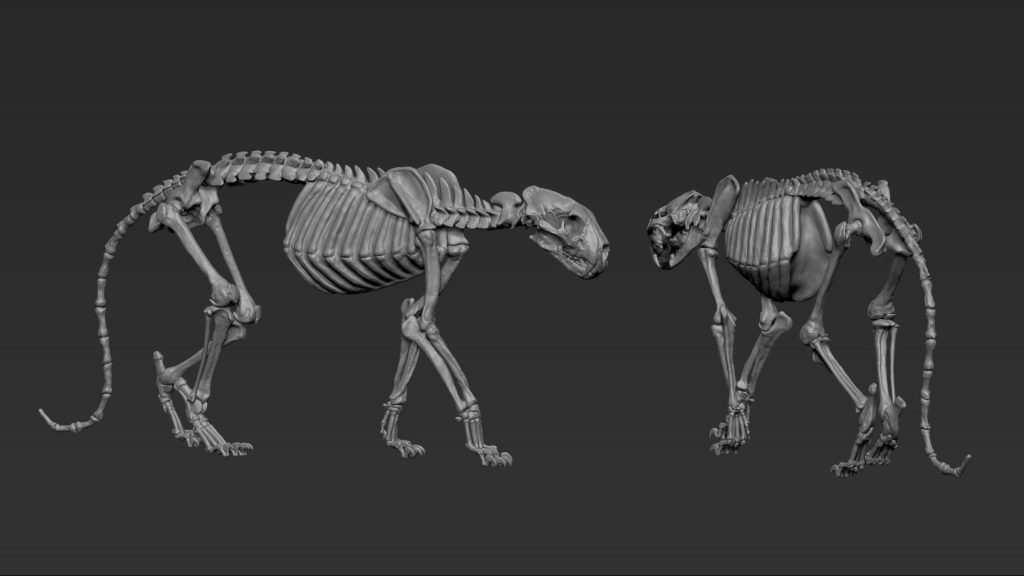
I started modeling by sculpting the Skull first. This is the most important part of the creature. Everythings about the skull must be right. It had to look right, feel right and have the right proportion. The reason for that is with that right skull, you can use it to measure and build up other bones to make sure the whole skeleton system has the right proportion.

Besides proportions, when I was sculpting in Zbrush, I mainly focus on how to blend primary shapes and secondary shapes together. To me, the sweet spot is when primary shapes are mainly visible, while secondary shapes help to breakdown and make the primary one look less boring. But the secondary shade cannot override all the information of the primary shapes. Then, when got that, I added some surface detail to make the model look more realistic and interesting.

After finished the skull, I moved to work on the skeleton systems. I intend to split every skeleton into individual substool, so I could easily adjust and posting later on. I used Insert Mesh Brush and Dynamesh for creating and blocking the primary shapes of every bone. When it was done, I used Zremesher to nail the topology, then Subdivide the mesh to add secondary shapes and details.
Building Muscles and Detailing Echorche
I used the same method to build up muscles from the skeleton system. At this point, everyone had their own workflow, others wanted to merge everything, but I rather kept every muscle separated. In my opinion, working this way makes the creature look more realistic because everything overlaps with each other in the right way, casting shadows inside creases and corners rather than just a simple brush stroke.

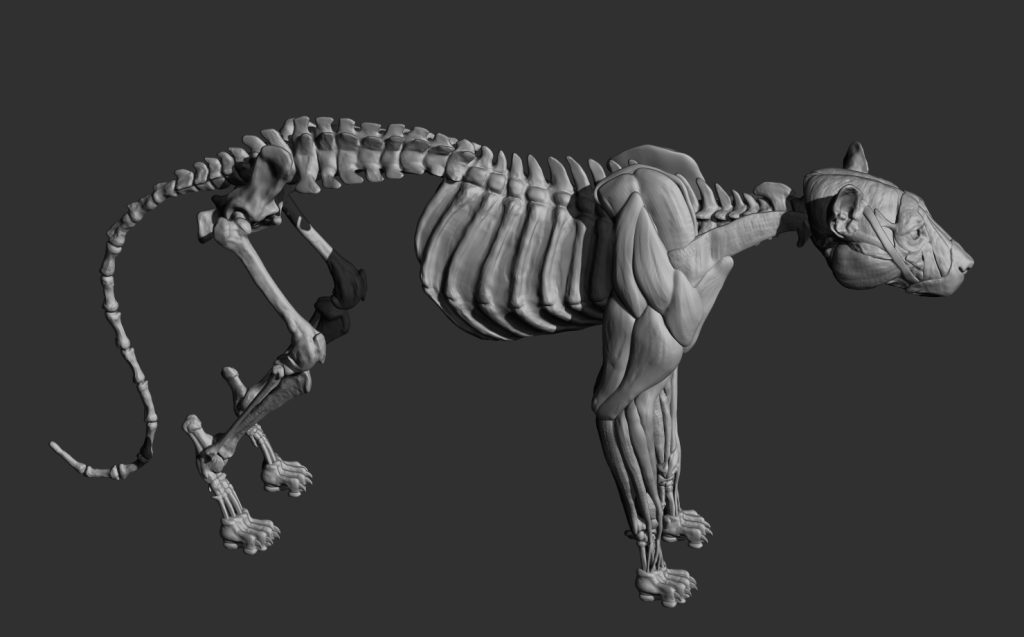
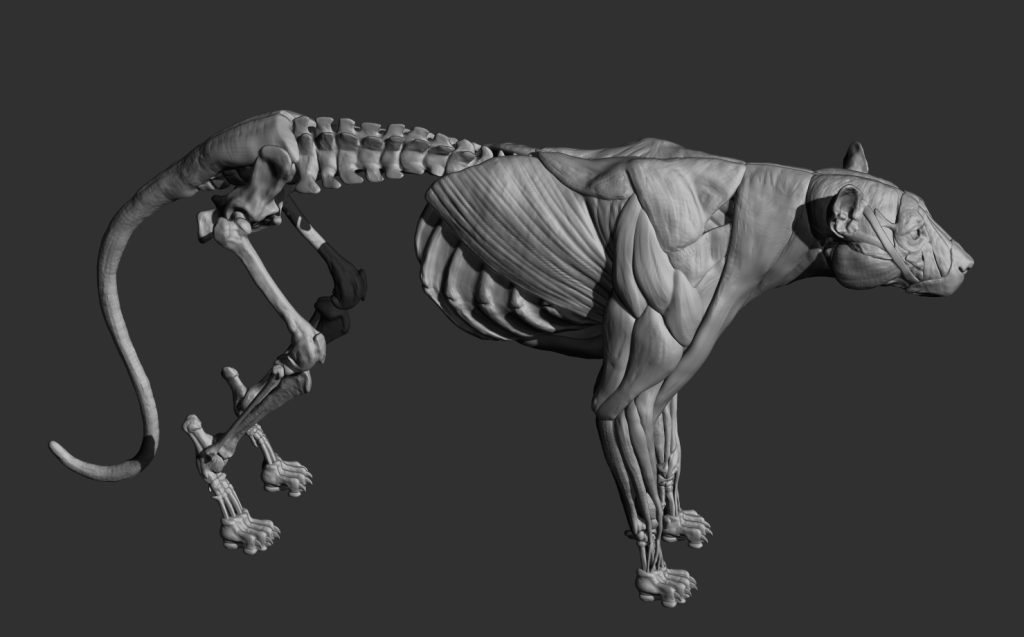

When adding muscles, the proportions may look a little bit off but I wasn’t too concerned about that. I was focusing on the anatomy of the animal because every muscle is separated, I could easily move/rotate/ re-sculpt every wrong one without affecting the others.
After adjusting the proportion and overall shapes, it’s time to start detailing the ecorche. This step can be totally skipped, but I already had plans to render this ecorche later. So I just go for it!
Keeping everything separated is fine. But It will raise up a lot of polygons and slow my computer down. And when I’m detailing, I cannot work seamlessly between every substool. So for the purpose of detailing the ecorche and adding skin later, I decided to merge down everything into a new file. Then I retopology the model by Zremesher, subdivide it and project with the old model to bring the details into the new one then start sculpting. The main brushes I usually use are dam standard, clay buildup, h-polish, and move. These’re just basic brushes in Zbrush.
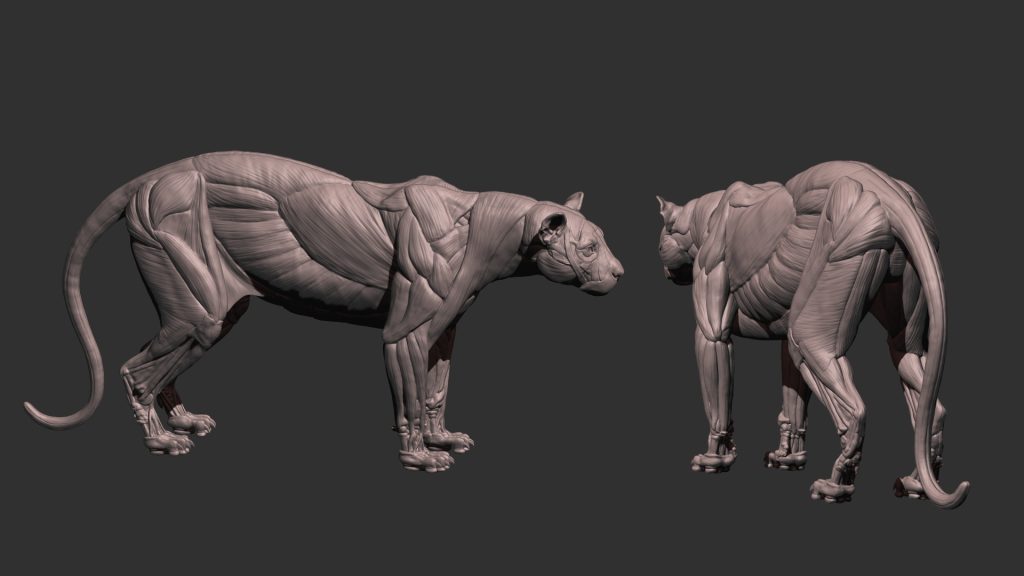

While detailing, I kept fixing the proportion for the animal, building up volume and shapes for the muscles, creasing conner to make it more appealing and adding muscle fiber, a bone landmark on the surface to make the ecorche feel much more believable. One more important things, I kept everything in a separate layer. So I could easily turn down the intensity or adjust each layer independently without affecting other parts.
Adding Skin on the Creature
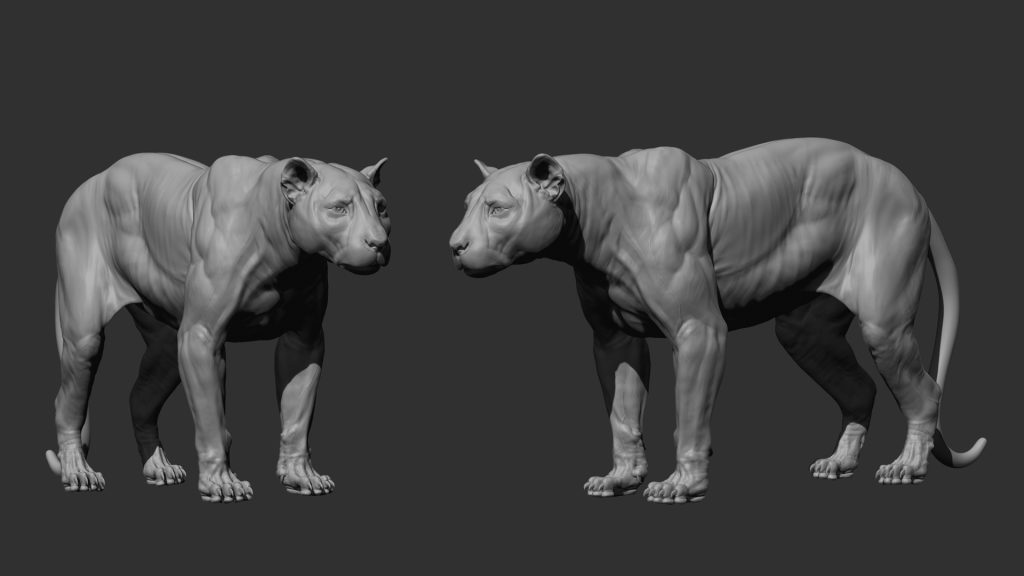
Things get much easier, when bone, muscles, and proportions are well established. I used the ecorche as a base mesh to add skin on top. First, I created a Morph Target of the current mesh. Then I made a Skin layer and started sculpting on it. Whenever I want an area to get back to the original mesh, I used Morph brush and start painting that area.

At this point, I collected more references about the real-life leopard, studied them about how does the skin fold? how is bone landmark appear? which muscle is visible? which muscle is covered by the skin? etc….
The more I understand, the more realistic this animal could become. Because some areas ( paws, face, ear…) has a very complex shape and detail which you can’t simply sculpt by imagination.
Posting and Create Maquette
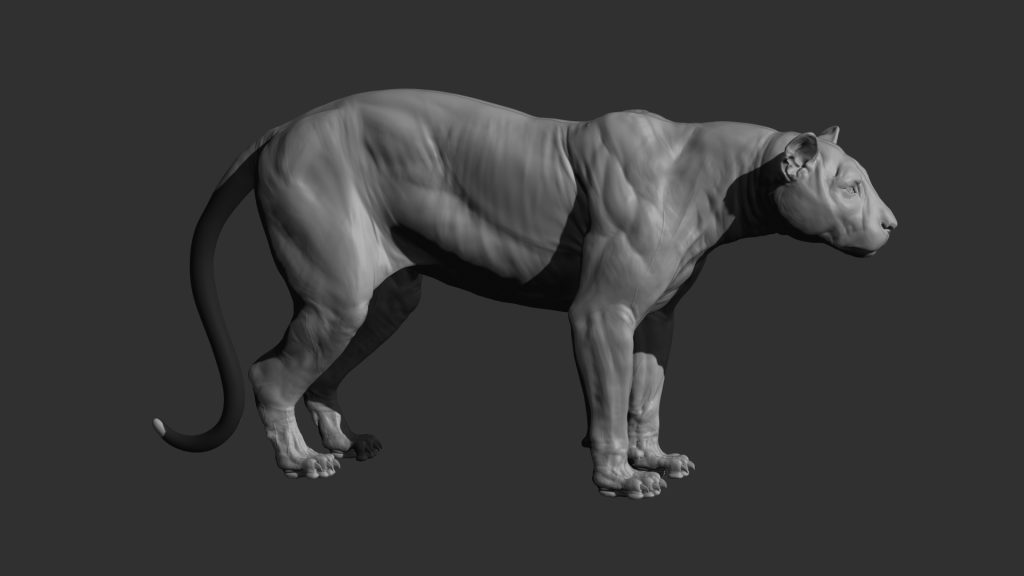
My first attempt when start posting was to create a complex aggressive pose to express how dangerous this creature is. But when I was doing that, I ran into lots of trouble like mesh was bending/broken, losing detail which I had to resculpt some area and It was too much time-consuming. The reason for all those issues was because this creature was still in ZBrush, it didn’t have proper topology and rigging. So when I tried posting it with only transform and move tool, It was way too easy for me to mess up the whole mesh. That first attempt was really a disaster for me so I quickly dropped it.

My second attempt was much more simple. I found some references when leopard goes hunting. they slowly walk to their prey, by doing that, they look so dangerous and terrifying and that walking post is really big cat’s signature. On the other hand, the walking pose is much easier to pull out with less effort and risk. So I decided to go for it.

Same as the skin, I created a new layer for posing and sculpted on that. When posting, I still needed to resculpt some areas to keep the details fitting with a new pose, but not much work as the first attempt. I’m quite happy with the result.
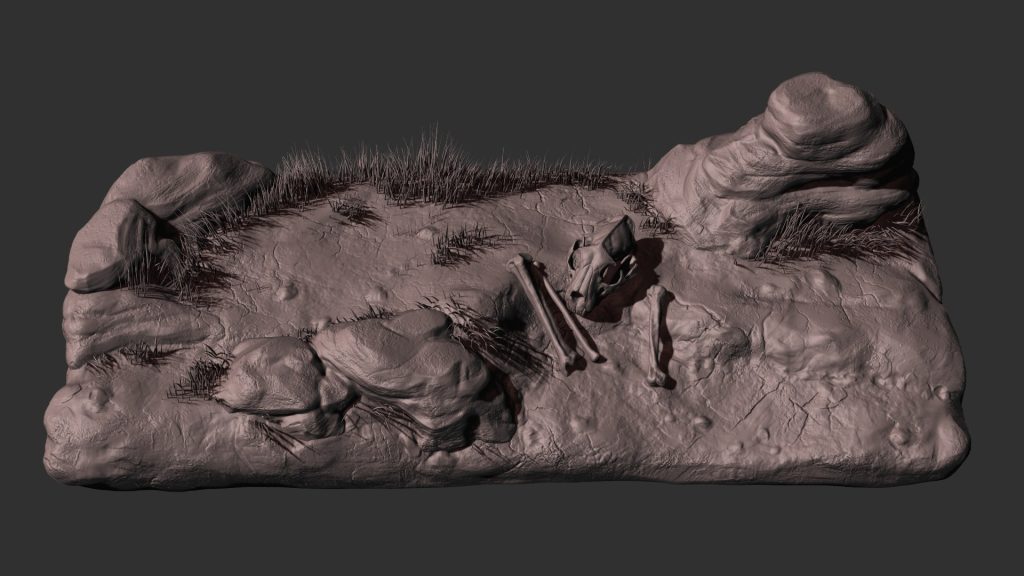
For the final rendering, I need two versions. A skin version (version A) looks like a miniature, another version (version B) has a skeleton, ercoche, and skin line up.
VERSION A:
I creature the Base in ZBrush sculpted some rocks and placed them around to add a little more complex to the scene. I used Zbrush Fiber mesh for the glass. I also reuse the skull in some bones of this animal to decoration and add story for this.
VERSION B:
I only use a simple base which had been modeled in Maya and ZBrush. The idea of this version to create an illusion of a photograph of three figures standing next to each other.

Lighting and Final Render
I like to use quite a number of light to lit my scene, especially the spotlight. By doing that, I could be able to control where the light hit lit things up and where I didn’t want to. So I could show want I want to show, and hide what I don’t like from viewers. Area and spotlight was my main light source. The backdrop is needed for the bouncing light to help the scene feel more believable and realistic.


I also used a different light set for every scene to make the mood and look every one of them feels right, not be over burned or darkened in some areas. The key thing is every light set need to have the same intensity and feeling to keep consistency between different camera. By doing that, I can trick the viewer to believe that this creature is always in the same environment with the same lighting setup.
I used Arnold for rendering. It’s a little slower than other render engines, but the result is quite good and works well for me. Because these models are decimated mesh in ZBrush and have no UV, So I only use aiShader to handle pretty much all the lookdev. Only the backdrop uses texture. And the shader is very simple, just some base color variations sit on top of SSS (subsurface scattering).

Afterword
So this is the end of this project. I have learned so much during this CGMA course. It’s quite difficult for me to work on these animal anatomy things because I have never get in so deep into it.
The biggest challenge is building up the muscle from the skeleton because every one of them has quite a unique shape. There’s a ton of muscle stacking up onto each other, layer to layer. And every one of them has to connect to several bones in the skeleton system. So for a first-timer like me, got lost in all of those things is unavoidable.
So, thanks to Gael Kerchenbaum with his feedback and guidance, I was able to punch through it as well as complete the project and get a pretty good result (good for me, not so sure for others). Besides, learning about animal sculpting, I also my lighting, rendering, and compositing skills during this project.
Thanks for your time! See ya!


